
We all EAT with our Eyes and CRAVE what we See. Creating those beautiful Treat like images is what we all desire to do . In this post, I have put together 7 Pointers to Create Beautiful Candid Images.
My blog turns 7 years tomorrow and I am taking this as a double opportunity to showcase what I have learned in the last couple of years .A couple of days back, Lindy co – ordinating at UK Blog Camp also wrote to me about conducting a Food Photography session. I was really not sure if I will be able to do justice. Spending a few working evenings, I decided to put together some essential pointers on How I go about Creating Beautiful Candid Images.

It was wonderful to see some positive reaction from a lot of participants and so glad that they had enough takeaways when they walked out of the room. Scroll right to the bottom to see their wonderful comments.
Just in case you missed attending the UKBlogCamp, here are the pointers that we covered in detail.

LIGHT IS EVERYTHING
And I do worship Natural Light. The moment you look at a Food Picture, the first thing one notices is Food . The second thing that people notice is how bright/ dark is the image. Is the image shadow loaded ? Is there enough light? Everything within a photograph, essentially food works with lighting!
Find a well-lit spot in your house and push your table near the window sill and begin exploring different lighting techniques – Backlighting, Sidelighting & Front-Lighting. If you find the light is quite harsh, which rarely happens in the UK, hang a thin scrim/ white curtain on the curtain rod and peg them. Alternatively, you could use some store bought diffusers. This helps in softening the harsh light.

Imagine you are planning to shoot a bright airy image. Once you shoot your test image, if you find there are enough shadows on the opposite side of the light source, use reflectors to fill in light. For eg: the image of Strawberry Lassi.
SO what are reflectors? They are white cards/ white foam boards to fill in light. An Instant DIY trick is to wrap an aluminum foil around a cardboard .

SAY NO TO FLASH
Be it P&S or DSLR, do not use Camera’s inbuilt Flash. They create boring, dull , unreal, unappealing & funny colored images. I can really fall short of adjectives. Professional photographers do use an external flash to bounce light but they never do it on the subject.

COLORS & BACKGROUNDS
Colors play a vital role in Food Photography. Once you begin to understand the concept of colors, you will begin to choose your ingredients, garnishes, props & backgrounds wisely. Make a few conscious attempts of looking at the color wheel and you will subconsciously start mix matching the colors needed for the image.
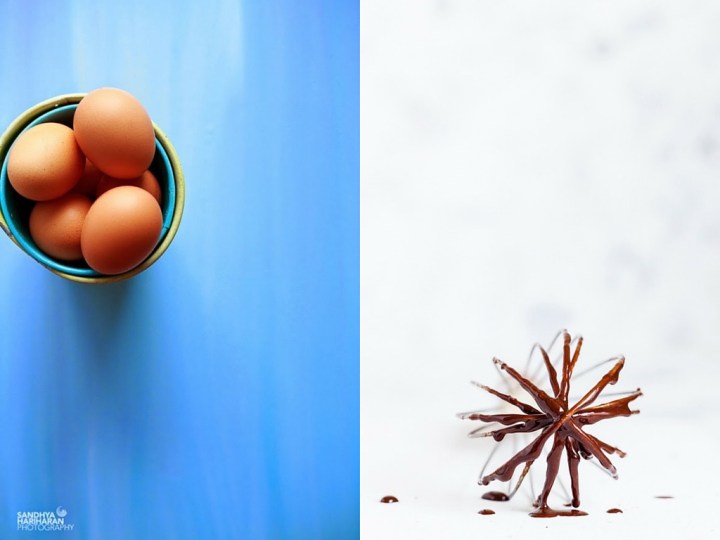
Complimenting Colors: Colors sitting on the opposite side of the color wheel. Classic example is Blue + Orange or Blue + Brown
Monochromatic Colors: All the shades of colors of the same hue
Analogous Colors: Colors adjacent to each other in a color wheel
Contrasting Colors : Any other color coding other than the ones mentioned above.
Find below some examples of these color combinations in my images.


BACKGROUNDS:
Choosing the right background depending on the color coding is very important for an image. They range in different colors and textures right from Wood,Fabric,Stone, Slate to vinyl backgrounds,distressed wood, shutter cabinets. I decide upon them depending on the lighting, mood, color coding and theme for the image. Backgrounds should not overpower the subject ( Our Hero – ” Food” ). It should be be subdue and aid the Hero.
I thoroughly enjoy hand painting my boards and a lot of boards reflect my mood that particular day.

COMPOSITION
One of the essential subjects in photography is composition. Arrangement of elements in a specific way within a frame.

Rule of Third is one of the most well-known composition rules. Imagine you divide an image into thirds, you have 9 parts and 4 intersection points. Carefully place you ‘Hero – the food’ at one of those intersection points and place your supporting artists at the other -one or more points. People’s eyes will naturally tend to flow through these points.
Negative space adds an interesting element to an image. Also adding some strong emphasis on the subject. There is enough space to write captions, texts, logo’s and even recipes.

Movements/Patterns : Arrange your elements in the frame in a planned movement – lines, diagonal lines, radial, zigzag, alphabets and natural curves. Such patterns add a curiosity and interesting elements to your composition.


Balance & Symmetry: Place your subject right in the middle with equal spacing on the sides is Balance. Identical arrangements/plating in a frame is known as symmetry.


IT’S ALL ABOUT DIFFERENT ANGLES
Once you have decided on the lighting technique,mood, color coding & composition its now time to work on angles. If your food has got height use Eye Level. For eg the image below with stacked mini cakes, there are 4 levels of heights in the image. And an eye level works well for showing off the textures and height.

For an Image like the Soup in the image – an Angled shot works perfectly. Using an eye level shot for this soup set up would only leave us seeing the rim and area around the gray bowl. We need to know what’s going to the bowl along with showing off the cozy mood on the Window pane. Doing an overhead shot is possible but the mood could not be reflected as desired.
When the subject is lying flat , an overhead shot / top down shot works really well. Here are 2 examples of overhead shots ( Instagrammers favorite shot)

DEPTH
A Shallow Depth of Focus makes the subject stand out artistically against a blurred background while the Deep Depth of Focus Image shows off every single detail in an image. The idea of DOF is to use them wisely…
When it comes to portraying ingredients, showing off all the details in the image is essential and Deep DOF works well. You may experiment them anywhere between f /7 – f/11. Even higher if needed.
Look at the comparison image below of Green Grams in a white casserole with a scooper. Its entirely personal choice on what you would like to portray. In my opinion, a Deep DOF works well here… as every bit of the grain, scooper, casserole is in focus,leaving the background blur. So what do you think?
Choose your Depth Wisely!

SEDUCE WITH ACTION
Connect with your audience with a personal touch – Some action, Some movements. I enjoy adding some form of action in my images and this definitely creates a buzz. Some oohs and Aahs!! Don’t forget to mesmerize with your action..


READ, GAZE & PRACTICE
is something that I would do ritually. Visit Pinterest to gaze ( I know we all do , but it s more than pinning images) and your favorite blogger’s and food photographer’s space to gaze. Pick up an image to read and understand. Understand the direction of light, understand the arrangement. Reason why they have done that? What are they trying to portray.. This exercise helps you to broaden the spectrum and think way out of the box.
And last but not the least !! PRACTICE PRACTICE AND PRACTICE. There is no substitution/shortcut to practice.
A great photograph does not happen by Fluke. They are due to numerous considerations and techniques followed depending upon the Light,Mood,Composition, Depth and their personal touch.
Some of the comments from the lovely ladies..

Check out my Food Photography Tutorial on “How To Shoot Pictures on White, Bright Background?” if you have missed it earlier.
Do let me know what are your pointers in creating beautiful candid images!!
Fabulous post, thank you so much for sharing! I’m learning all the time (mainly through trial and error) but there’s lots here I wish I’d known when I first started out!
Thank you Camilla. I am so glad you have a few pointers to take back. Give me shout and I will be happy to clarify them.
Very informative post Sandhya ..understand why? a very valid point.. seduce with action is my favorite and would like to explore more.
Thanks Meena.. It takes a little while to analyze an image too.. But its sheer practice.
An informative post Sandhya. Appreciate your efforts in putting up such a lengthy post covering in detail each and every aspect of high key photography. Superb!!!
Thank you Nursath. I really hope you found them apt.
I have always adored your clicks! Wonderful tips for an amateur like me..
Thank you Priya. Shoot me messages and I am happy to help.
What a wonderful post, Sandhya! Loved every bit. And congrats on your blog anniversary!!
Thanks so much Anjana.. Glad its handy.
Beautiful post sandhya great work! all pics are so beautiful! Happy 7th blog anniversary, Wish you many many more successful years .
Thank you Binjal.. You are a lovely photographer yourself:)
Very well explained Sandhya. Very helpful and beneficial to all those who aspire to become great photographers.
Thank you Shaheen. I am so glad to read your feedback:)
Wow! Sandhya. Very beautifully explained. So thrilled to hear that the session went well. And Congratulations on the 7 years of blogging!. Wishing you many more.
Happy to hear Sreelatha.. Thank you 🙂
Oh awesome. Happy 7th blog anniversary. You are a rock star as always. This was a wonderful read girl. Great work. And I am so glad to read about the blogcamp comments. Keep rocking and keep inspiring us.
Thanks Jyothi… ( Blushing full on )
Wow! What an AMAZING blog, Sandhya! Your colours are extraordinary, you’ve given me an appetite for some of your recipes and I’ve learnt something too! My Stepson is a prof photographer but in reportage. Has used long exposure and a cigarette lighter in Ugandan village at night rather than flash and the results were startling, flash can really flatten out an image. Interested to apply some of your thoughts to my cartoons – I’ll go off and do that now in fact ! All the best, Jo
Thank you Jo. Wow.. thats so nice to know about your StepSon..Those pics must be really candid. I would love to check his pics out.
Very useful share and Happy Blog Anniversary
Thank you Alka..
Very informative post
Lovely post sandhya! And Happy blog anniversary!
Thank you Janani.
Hey my lovely! Brilliant post! During your workshop, I typed so much my thumbs were hurting! I’m so glad you’ve written it all up. Will be pinning now! x
You are the sweetest Mel.
Love post. Love all the images here and the concepts are clearly explained.
Congrats on the 7th anniversary.
Thank you Raksha.. I am so glad that you found the pointers handy.
Wow wow great great post dear……. U r such a big inspiration for me…….. Congratz for ur 7 years of blogging….. u really rockzzz…… 🙂
So glad to hear Remya:)
That was a great post to shoot pictures on white background and very informative. Lots to learn there 🙂
Thank you Hiba..
Lovely post Sandhya. Your pictures are a revelation!
Thanks sweets.
Totally loved how you put all the pointers into this post… really informative… 7 years is not a small time, wish you many many years of blogging. I am pinning up this post… I always wish I had time to click more, hopefully soon I will be able to get a bit more creative with my pictures…
Thank you Rafeeda… You are doing a fab job.. Take it slow and steady..Explore and play around and you will be fine.
Great post and fab advice here and some utterly scrummy photos.
Heyy thanks Stephanie:)
Thank you so much for all these pointers you gave us on Saturday and for putting the slides up here. It was really really useful and your photos are really really beautiful. Taking the time to study is my biggest downfall and something I need to get sorted.
Thank you for stopping by Choclette. I am glad you found the session handy.
Loved each and every bit of it. A great post. Wishing you many more successful years to come.
Thank you Sushma.. As Every year passes, there is so much to learn .. so much to do..
Sandhya!!! You have to give me board painting lessons.. when can I come over? ; )
No seriously! Please take some time out and post a tutorial on the same especially the way you do strokes here.. you would do us a huge favour 🙂
I loeevvvee your motion pictures. Awesome! well done and keep up.
Come over Nupur anytime… Lets plan a meet, painting and gobbling all the delicious goodies:) Thanks again;)
Such a gorgeous post! very informative.Thanks for sharing
Thanks a bunch Sai Priya. My pleasure.
Amazing and beautiful post <3 <3
Had bookmarked this post when you had posted Sandhya. Got time to read today. Beautiful post. Your beautiful pictures have explained everything that you wanted to tell here. You should conduct many more workshops like these. Wish you all the luck dear.
Thank you so much Subhasmita for taking time in leaving such a lovely comment. I am absolutely elated!!
Hello from Ireland . I learnt a lot from this post Sandhya, so well written too. Is it ok to post it in one of the Irish Bloggers group I’m in ?
Please feel free to share with your group Mira.
Firstly heartiest wishes for “7 years of blogging”. You are doing one amazing job.. enjoyed the post. Hope to see many more such posts in the days coming by.