These Easy No-bake Mini Egg Cheesecake Jars are the only ones you’ll need. They are a fun and cute way to serve delicious Easter Desserts.

About this Easy Mini Egg Vanilla Cheesecake jars recipe
If you hate Cheesecake and Creme eggs, then these No-bake Mini Egg cheesecake Jars are just for you. They are fresh, creamy, and simply delicious. It’s the easiest Easter pudding that must be on the Easter menu.
I love serving my desserts in Mason Jars because they are easy to serve, great-looking, and perfect for portion control. Just like No-Bake Mango Cheesecake Jars, Eggless Tiramisu Jars, Mango Mousse Jars, and Chocolate Mousse Parfait Jars
There is no way you can mess up with this easy eggless dessert recipe because it has No Eggs and No Baking needed.
This jar dessert is all about fun and deliciousness! Made with just 7-8 ingredients, these mini egg cheesecake jars come together in just 10 minutes and a couple of hours to set.
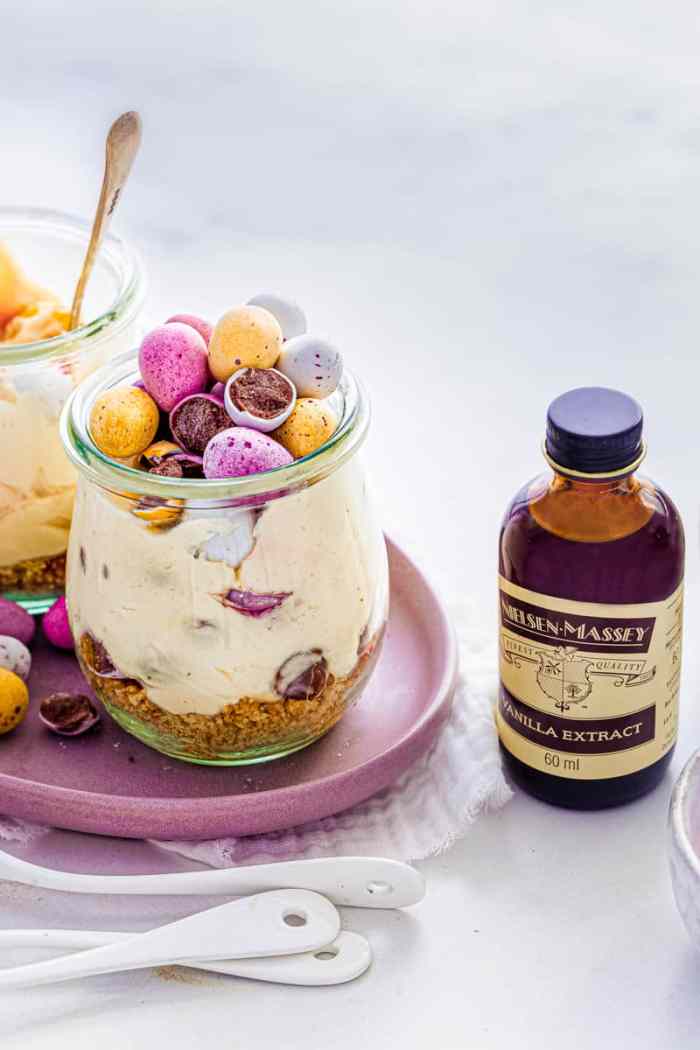
Loaded with Cream Cheese, Double Cream, Sugar, Gourmet Vanilla Extract from Nielsen-Massey Vanillas, and Mini Eggs, they are light in texture, luxurious, and indulgent.
Why you’ll love this Mini Egg Cheesecake Jars recipe?
Super easy Dessert – It is one of the best and easiest desserts to make with all the Easter chocolate treats. Quick, easy, creamy, delicious, and requires only a handful of ingredients! Prep time is only about 10 minutes.
Family-friendly dessert – These Cheesecake jars are not just for kids, they are for everyone!
Portion control – Jars desserts are good for portion control. Instead of serving large slices, you can serve mini portions in jars. If you really love it, you can always have one more jar.
No-Bake recipe – You really don’t need to turn on the oven or stove or microwave with a long list of ingredients to create the recipe.
Creamy Cheesecake Filling made with cream cheese, cream, sugar, and vanilla. And of course, some crushed mini eggs too.
Can’t go wrong – You really cannot go wrong with this dessert, because it has got no eggs and no baking needed. Since they are served in jars, there is no worry about slicing them perfectly too.
More Cheesecake Jars – The recipe can be easily scaled up or down too.

Key Ingredients
All the ingredients for our no-bake cheesecake with easter eggs listed below are easily available at local grocery stores.
Digestive Biscuits – Any local store digestives will be good for the crust. You can also use shortbread, graham cracker, or even granola instead of digestives.
Butter – Use unsalted melted butter for the crust.
Cream Cheese – I like to use full-fat cream cheese for making these eggless mini egg cheesecake jars, which gives us a creamy texture and flavour.
Vanilla Extract – Gourmet Vanilla extract from Nielsen Massey is my favourite ingredient for all desserts be it jar desserts, no-bake ones, waffles, pancakes, cakes, brownies, and milkshakes. Nielsen-Massey vanilla extracts and paste uses premium, hand-selected beans and a cold extraction process that preserves vanilla’s 300+ flavour compounds to ensure a true-to-bean, creamy flavour profile with velvety after-tones.

They are a great addition to any classic British baking or cocktail recipe,
Sugar – Icing Sugar / Powdered Sugar gives a smooth texture to the filling.
Cream – Cold double cream or heavy cream is one of the key ingredients in the recipe. It is available to buy in the refrigerator section at the grocer. You can also use Whipping cream, however, double cream has a higher fat content – about 49%, which helps in holding the peak well after whipping.
Mini Eggs – Any chocolate eggs from your Easter treats can be used. You can also buy from the supermarket, or from the seasonal section. So many popular brands sell mini eggs – pick the ones you love.
How to make Individual No-Bake Mini Egg Cheesecake Jars step by step
It’s really easy and straightforward to make Cheesecake Jars. And there are only 3 steps involved.
There are Only 3 Layers in this Mini Egg Cheesecake Jars
- Cheesecake Base
- No-Bake Cheesecake filling
- Toppings of your choice.
Cheesecake Base
Buttery Cheesecake crust is made with Digestive biscuits and unsalted butter. Combine the two together and layer them on the base of the jars. You can crush the digestive biscuits with a rolling pin or use a food processor to crush them.
Sub shortbread, graham cracker, or even granola for digestives, if you like.

Cheesecake Filling
This is the most delicious and indulgent layer of the Cheesecake Jars.
Whip the Double cream ( heavy cream) into a soft peak. Next, combine cream cheese, Gourmet Vanilla Extract from Nielsen Massey, mini egg, and icing sugar till smooth. Fold the cream into the cream cheese mixture, gently so that the cream is airy and doesn’t deflate.
Carefully pipe this no-bake cheesecake filling on top of the crust layer, filling up nearly up to three-quarters of the jar.

Toppings
Finally, pile mini eggs on the top.
Chill in the refrigerator until you are ready to serve.
If you like, drizzle chocolate syrup or garnish chocolate carrots on the mini egg cheesecake with easter eggs. (Optional)
Enjoy!

Serving Suggestions
Serve individual mini egg cheesecake in jars, with your favourite toppings, or even whipping cream.
I like to pile mini eggs on the top and sometimes chocolate carrots – Just perfect for the Easter theme dessert.
How to crush mini eggs?
Place the mini eggs in a ziplock bag. Using a can or rolling pin, bash the eggs until they are crushed. You have mini eggs ready for your cheesecake.
How much should I whip the cream?
Whip the cold double cream into a soft peak that still holds shape. Do not whip too stiff as the pudding will be too dense.
You do not want the cream to be runny, as the easter pudding will be too soft/soggy.
How do you serve Jar Desserts?
This mini egg vanilla cheesecake can be served in shot glasses, weck mason jars, tumblers, wine glasses, martini glasses, or even mix match jars.

If you love No-bake Cheesecake Jar desserts, you will also love
No bake Strawberry Cheesecake Jars
How to make Mini Egg Cheesecake Jars?

Ingredients
Cheesecake Base
- 125 g Digestive Biscuits
- 50 g Unsalted Butter melted
Egg Cheesecake Filling
- 1 Cup Cream Cheese ( 180g)
- ½ Cup Icing Sugar (50g)
- 1 Cup Mini egg crushed
- 2 tsp Nielsen- Massey Vanilla Extract
- 1 Cup Double Cream (200ml)
Toppings as needed
- 1 Cup Mini eggs
Instructions
Cheesecake base
- Place the digestive biscuits in a plastic food bag and seal it. Crush them with a rolling pin and transfer the crumbs to a mixing bowl. Add the melted butter and combine thoroughly.
No Bake Vanilla Cheesecake filling
- Place the cream in a bowl and whip until the cream resembles a soft peak.
- ln another bowl, add cream cheese, sugar, mini egg, & vanilla extract.Combine with a spatula.
- Fold the cream into the cream cheese mixture and fold gently so that the cream is airy and doesnt deflate.
Assembly
- Divide the biscuit filling between 6 Jars approximately 1 tablespoon in each. Press it with the back of the spoon.
- Spoon or pipe the cheesecake filling into the jars until 3/4 from the top.
- Top it up with mini eggs.
- Chill for 3-4 hours or until you are ready to serve.
Nutrition
Disclosure – This post is sponsored by Nielsen-Massey Vanillas
Leave a Reply